Tampilkan postingan dengan label CHRISTMAS COOKIES. Tampilkan semua postingan

Jumat, 13 September 2019

BRANDY SNAPS

If you want to impress your guests, make some of these Brandy Snaps for them. They look so elegant and they are definitely not something you see on every dessert tray.

A hard candy shell filled with sweetened whipped cream...do I have your attention yet?  Pretty fool proof if you follow my extra tips below printed in RED, AND you can make them days in advance and fill them just before your guests arrive. 


BRANDY SNAPS


Brandy Snaps are basically a crisp, sweet, lacy, candy shell that you can fill with sweetened whipped cream or your favorite mousse.

They look very hard to make, but it is an illusion; they are pretty easy if you pay attention to the tips below in RED.

2 tablespoons sugar
2 tablespoons white corn syrup
1/4 cup butter  (I used only 3 tablespoons)
2 teaspoons brandy (or) 1 teaspoon vanilla (I used rum extract)
1/4 cup all purpose flour

Since this whole process goes VERY fast, it is best to have everything ready before you start cooking the above ingredients.

Preheat your oven to 350� and line a cookie sheet with parchment paper (important). These candy shells REALLY spread as they cook, so only plan on making six of them on each cookie sheet.

Mix the sugar, corn syrup and butter in a small saucepan. STIR over medium heat until the mixture is good and bubbling, then remove from heat and stir in the flour and flavoring.

Drop one measuring teaspoon (per candy shell) of the cooked mixture onto the parchment paper. This will spread out into a circle about 4" in diameter as it bakes for about 6 to 7 minutes, but watch them very carefully after six minutes, as they can go from caramel colored to DARK very fast. It sounds tricky, but it isn't.

My candy circles were fairly pale in color until they hit the 6 minute mark in my electric oven, but they were a beautiful light caramel color at 6 1/2 minutes.

When they have turned a nice light caramel color, remove from the oven and let them sit on the cookie sheet for about 30 seconds. If they look a little oily, LIGHTLY dab them with a paper towel.

Use a pointed knife and lift the edge of the candy circle up a little so that you can grab it with your fingers (be careful, this is VERY  hot). One at a time, quickly roll the candy circle around the handle of a wooden spoon (they will cool almost immediately and hold their shape).

Once you form it around the spoon handle, it will instantly be cool enough to slide the candy tube off of the handle, and it's done!! 

If the other candies get too "hard" to roll, put them back in the oven for 30 seconds or so (but that shouldn't be a problem, as they stay fairly pliable as long as they are on the hot cookie sheet), they only become rigid once they cool off.
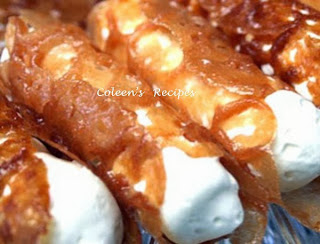


I didn't use a spoon handle, I used some metal cannoli tubes I have and they worked perfectly (no need to grease the spoon handle).

Keep the cooled candy tubes in an air tight container until you are ready to serve them. Fill them with sweetened whipped cream (the candy tubes can be filled up to about an hour before serving).

Don't be scared off by any of my "warnings' about this recipe, it may sound complicated, but it really is pretty easy and I hope you try it.

NOTE: I substituted rum extract for the vanilla, the candy tasted like butterscotch. I think ANY extract would work.

NOTE: You don't have to fill these with whipped cream. Almost any mousse like whipped filling would work wonderfully.


THIN MINT CHRISTMAS COOKIES

It is time to start planning your Christmas cookie list, isn't it? Today's cookie is truly a five star keeper!!

These festive cookies taste just like Thin Mint Girl Scout Cookies(only better!!) and they only take TWO INGREDIENTS to make!!! People will think you've been working on them all day.


I drizzled some white chocolate
decoration on these, just for fun,
but it certainly isn't necessary. You
can use holiday sprinkles instead.

You will need some Nabisco Famous Chocolate Wafers and some Andes (creme de menthe) chocolates.....that's it!!

The chocolate wafers come in a 9 ounce package and I found the Andes Mints (those creamy little chocolate mints with the green center) in a 4.67 ounce package.  There are 28 mints in the package and one package will do a dozen cookies (I found the mint packages for $1.60 here in Alaska, so hopefully you can find them even cheaper.

I unwrapped and then melted the chocolates in my microwave for about 30 seconds...stirred and then microwaved them for another 10 seconds (stir until the chocolate is smooth and shiny). Dip the chocolate wafers in the melted chocolate (both sides) and place on some parchment paper (or waxed paper).

Stick them in the fridge (I used the freezer) for about 5 minutes to "set" the chocolate......that's it!!  

NOTE: If you are having trouble finding the Andes Mints, just use the Andes Mint baking chips (next to the chocolate chips) they will work just as well. 
MERRY CHRISTMAS!!!?


?

Kamis, 12 September 2019

SHORTBREAD MELT AWAYS

This cookie has a very traditional shortbread cookie texture, yet it is light as a feather, sweet and literally melts in your mouth!!! These cookies are one of my families favorites and they are gone in a snap!!


1 1/2 cups butter (room temperature)
1 cup powdered sugar
1/4 cup cornstarch
2 cups flour
1 teaspoon vanilla extract
1 teaspoon coconut extract
1/4 teaspoon salt

Beat the room temperature butter for about a minute, or until it is smooth. Add the powdered sugar, salt and extracts and beat on medium high for another minute.

Add the cornstarch and beat until well mixed. Add the flour, one cup at a time, beating well in between each cup.  Beat everything for one more minute, then cover and chill for about 30 minutes (I seldom chill the dough and it does ok).

Roll the dough into 1" balls and then roll the balls in granulated sugar. Use a fork to gently press down on the cookie ball (see photo).

Bake on ungreased baking sheet for 10-12 minutes at 350�. You will know when they are done because they get lightly golden around the edges. Cool on the cookie sheet for about 30 seconds before removing them.

These are excellent frosted AND unfrosted.  Makes 36 cookies.

NOTE: If you don't have coconut extract, you can just use 1 1/2 teaspoons of vanilla, however, the coconut extract truly adds a wonderful taste. The finished cookie does NOT taste like coconut, but it adds a wonderful yummy-ness to it, so I hope you will try it.

PECAN TASSIES

Everyone seems to have their own favorite Pecan Tassie recipe, but the crust in 99% of the recipes out there is the same..... flour, butter and cream cheese.

This year, I added just a little extra something to the crust part of the recipe and it made a HUGE difference to the overall cookie, they were a big hit.

Tassie Crust
1 cup butter (room temperature)
6 ounces cream cheese (room temperature)
2 cups flour
2 tablespoons sugar
1 1/2 teaspoons vanilla extract
1/4 teaspoon salt

Cream the butter and cream cheese (with electric mixer) until it is light and fluffy. Add rest of the ingredients and beat until the dough comes cleanly away from the inside walls of your mixing bowl. Flatten dough into a disk, wrap in plastic and chill for one hour.


Tassie Filling
3 large eggs
3 tablespoons melted unsalted butter
1 3/4 cups light brown sugar
1 teaspoon vanilla
1/4 teaspoon salt
1 cup coarsely chopped pecans

Beat the eggs until very well mixed and lemon colored. Stir in everything else.


ASSEMBLYRoll pastry into 1 inch balls and place them into an ungreased mini-muffin pan. Using your fingers, press the balls of dough into the bottom of each cup and up the sides. (I use the floured end of my rolling pin to press the dough into place instead of my fingers). Put a few chopped pecans in the bottom of each pastry shell and top with about a tablespoon of filling. (see note)

Bake in pre-heated 375F oven for 15-20 minutes or until the pastry is golden and the filling is set, yet still a little soft in the center. Remove from oven and sit the pan on a wire rack for about 10 minutes before you try to lift them out. Lift tassies out of pan and cool on a wire rack.

NOTE: Keep in mind that the filling puffs a little as it bakes, so don't overfill the unbaked shells. If you overfill them, they will be harder to get out. For those stubborn Tassies that want to stick, just use the tip of a knife to help you lift them out of the pan.

EASY KOLACHE COOKIES

There are many different styles (and spellings) for Kolache cookies; some are made with yeast, some made with cream cheese, some are round, some are rolled up.

This recipe is a cream cheese and butter crust that is light as air and bakes up flaky and sweet. Instead of using dried fruit, it uses jam (any flavor you like) They are truly delicious and look SO PRETTY on any cookie tray.

CRUST

2  1/4  cups all purpose flour
1  cup UNsalted butter at room temperature
8  ounces full fat cream cheese at room temperature
1/2 teaspoon salt

Mix flour and salt and set aside. NOTE: If you do not have salt free butter, just omit the salt in this recipe.

In a stand mixer, beat the room temperature butter and the room temperature cream cheese on medium high speed for 4 minutes.

After you have beaten the butter-cream cheese for 4 minutes, slowly add the flour-salt  mixture (I usually add it in fourths), mixing well after each addition.

Divide the dough in half and shape into two flat disks about 3/4" thick. Cover and chill for about an hour.

After the dough has chilled for an hour, lightly coat each disk with flour and pat off any extra. Coat your counter with regular granulated sugar and roll out the dough to 1/8" thickness.

NOTE: If you are like me, I often don't get back to this dough within an hour and it is rock hard when I go to roll it out. If that happens, just let it sit out for 10 to 15 minutes to let it soften up enough to be workable. The dough is very forgiving that way.


Cut dough into 2 1/2 inch squares. Pick up each square and pinch two opposite corners together (see above photo). Lay it on a parchment lined baking sheet and spoon 1/4 teaspoon of favorite jam into each end of the cookie. Personally, I like to do this step with a disposable frosting bag and I just squirt it into each end opening.

Sprinkle the pinched center with a little more granulated sugar. Bake in preheated 375� oven for 12 to 14 minutes (my electric oven takes exactly 12 minutes). Cool on wire rack.


ENJOY !!

CLASSIC SHORTBREAD COOKIES

Sweet and tender, these old fashioned classic shortbread cookies are easy to make and ALWAYS a big hit. Picky-picky husband loves them frosted in pink (for some weird reason), they are one of his all time favorites.


CLASSIC SHORTBREAD COOKIES

2 cups UNsalted butter (room temperature)
1 cup granulated sugar
1/2 teaspoon table salt
2 teaspoons vanilla extract
1 teaspoon coconut extract
4 cups all purpose flour
(NO EGGS)

The cookie batter in the recipe is fairly heavy, so it works best in a stand mixer if possible.

Add 2 cups (one pound) of room temperature butter and 1 cup regular sugar into the bowl of your stand mixer. Beat until fluffy (about 2 minutes). The last 30 seconds or so, add the salt and extracts and beat until well mixed. (see note about salt)

Add the flour, 1 cup at a time, mixing well between each addition.
Dump cookie batter onto counter and divide into 4 sections. Roll each section into a "log" about 2" in diameter. Wrap each "log" in plastic wrap and chill for one hour. You can roll the entire CHILLED log in sprinkles or finely chopped nuts before you slice them if you like.


Pre-heat oven to 350� and slice chilled cookie dough "logs" into 1/4" slices. Place on UNgreased cookie sheet and bake for 18 minutes or until the very edges just start to turn golden.

Cool cookies and frost if you like.  If you aren't going to frost them, roll the sliced cookie's in granulated sugar BEFORE BAKING.

NOTE: If you do not have UNsalted butter on hand (no big deal), just use regular salted  butter, but LEAVE OUT the salt in the recipe.


ENJOY !!!!!

EASY CHOCOLATE WAFER COOKIES

I found this recipe over at smittenkitchen.com and it is a true keeper. Chocolate wafer cookies can be used for so many things. They are great in the ever popular no-bake eclair "cake", and they look so pretty coated with mint chocolate at Christmas, they are perfect for ice cream sandwiches, and much more. The only problem is, that commercial chocolate wafer cookies are sometimes hard to find in the store, especially around the holidays. So, here is a recipe that tastes just like Nabisco's chocolate wafer cookies.


1 1/2 cups all purpose flour
3/4 cup unsweetened cocoa powder (I use 1/2 cup)
1 cup plus 2 tablespoons sugar   (I use 1 cup)
1/4 teaspoon salt
1/4 teaspoon baking soda
14 tablespoons (1 3/4 sticks) UNsalted butter, slightly softened
3 tablespoons whole milk
1 teaspoon pure vanilla extract

Put the flour, cocoa, sugar, salt and baking soda in the bowl of your food processor and pulse several times to mix thoroughly.

Cut the SLIGHTLY softened butter into 12 chunks and add them to the flour mixture. Pulse several times.

In a small cup, mix the milk and vanilla and drizzle it into the cookie batter while the food processor is running. Continue pulsing until the batter clumps around the blade or the sides of the bowl.

Transfer dough to the counter (no extra flour needed) and knead a few times to form into a 12" x 2" log. Cover in plastic wrap and chill at least an hour. I like to square off the sides of the log to give me more of a square cookie.

The original recipe says to slice into 1/4" thick slices, but I find that 1/8" slices are better. Bake them on parchment lined cookie sheets (1 1/2" apart) in a pre-heated 375� oven, for 12-15 minutes. My electric oven takes 13 minutes.

Cool the cookies on the cookie sheet for a couple minutes, then place them on a wire rack. They will crisp up as they cool.

You can store these cookies in an airtight container for up to two weeks or they can be frozen up to 2 months, so they are a perfect "make ahead" baking project.


Coated with mint chocolate for Christmas
Here's the link: Thin Mint Cookies


No Bake Eclair Cake
Overnight in the fridge, the cookies 
turn into "cake"...delicious!!
Here's the link: No Bake Eclair Cake

ENJOY !!!